シンプルなAIアプリの続きです。
今回は、データの送受信処理を作成します。
ブラウザとサーバー間の送受信
ブラウザとサーバー間の送受信処理を作成していきます。
送信、受信ともに、データはJSON形式でやり取りすることにします。
ブラウザ → サーバーへは fetch()関数を使って、localhost:3456/ai-api にアクセスし、JSONデータをPOSTします。
そして、サーバー → ブラウザは fetchに対するレスポンスとしてJSONデータを送信します。
サーバー側の送受信
サーバー側のプログラムを作成します。
Gemini APIに対する処理はいったん忘れ、/ai-api にアクセスされた時に、POSTされたプロンプトをそのまま返すプログラムを作ります。
以下が、変更後のsrc/server/main.ts のコードです。
import { serveDir } from "https://deno.land/std@0.224.0/http/mod.ts";
import { IClientToServer, IServerToClient } from "../common/interface.ts";

async function handler(req: Request) {
    const url = new URL(req.url);

    if (url.pathname === "/ai-api" && req.method === "POST") {
        const { prompt } = await req.json() as IClientToServer;
        const sendData: IServerToClient = { status: 'Error', result: "プロンプトがありません。" };
        if (prompt) {
            sendData.status = 'Ok';
            sendData.result = `AI処理は未実装。以下のプロンプトを受け取りました。\n\n${prompt}`;
        }
        return new Response(JSON.stringify(sendData), {
            headers: { "content-type": "application/json" }
        });
    }

    return serveDir(req, {
        fsRoot: "public"
    })
}

Deno.serve({ port: 3456 }, handler);
ブラウザからのリクエストが /ai-api に対して行われているかチェックし、そのときはserveDir()関数での処理を行わないようにしました。
JSONデータを受け取り、プロンプトがなければエラーメッセージを返します。
プロンプトがあれば、「プロンプトを受け取りました。」とメッセージを返します。AI処理を実装した後は、この部分がGemini APIから返された結果に変わります。
共通ファイルの作成
新たに、src/common/interface.tsを作りました。
以下がそのコードです。
/**
 * クライアントからサーバに送信するJSONデータのInterface
 */
export interface IClientToServer {
    /**
     * クライアントからサーバーに送るプロンプト
     */
    prompt: string;
}

/**
 * サーバーからクライアントに送信するJSONデータのInterface
 */
export interface IServerToClient {
    /**
     * サーバーの結果
     */
    status: 'Ok' | 'Error';
    /**
     * サーバーからクライアントに送る結果
     */
    result: string;
}
interface宣言のみのファイルです。
ブラウザ側とサーバー側で、送受信するJSONデータが確実に同じフォーマットになるように、共通のinterfaceを宣言しました。
共通で使うため、src/common ディレクトリを作成して、そこに置くことにしました。
ブラウザ側の送受信
ブラウザ側のプログラムを作成します。
以下が、 src/client/script.ts のコードです。
import { IClientToServer, IServerToClient } from "../common/interface.ts";

// 送信ボタンのクリックイベントを登録する
const sendButton = document.getElementById("send-button");
if (sendButton instanceof HTMLButtonElement) {
    sendButton.addEventListener("click", async () => {
        try {
            // id="ai-prompt"のtextareaからプロンプトを得る。
            const prompt = GetPrompt();

            // プロンプトが空なら、それを表示して終了する。
            if (!prompt) {
                UpdateAiResult("プロンプトがありません");
                return;
            }

            // プロンプトをサーバーの"ai-api"に送信する。
            const sendData: IClientToServer = { prompt: prompt };
            const response = await fetch("ai-api", {
                method: "POST",
                body: JSON.stringify(sendData)
            });

            // サーバーから結果が返ってきたら、それを表示する。
            const json = await response.json() as IServerToClient;
            UpdateAiResult(json.result);
        } catch (error) {
            // エラーがあった場合は、それを表示する。
            console.error('Error:', error);
            UpdateAiResult(`エラーが発生しました: ${(error as Error).message}`);
        }
    });
}

/**
 * id="ai-prompt"からプロンプトを取得する。
 * @returns
 */
function GetPrompt() {
    const aiPromptTextArea = document.getElementById("ai-prompt") as HTMLTextAreaElement | null;
    const prompt = aiPromptTextArea?.value ?? "";
    // 前後の空白文字を削除したあとで返す。
    return prompt.trim();
}

/**
 * id="ai-result"のテキストをresultにする。
 * @param result
 */
function UpdateAiResult(result: string) {
    const aiResult = document.getElementById("ai-result");
    if (aiResult) {
        aiResult.innerText = result;
    }
}
コードの概要を説明します。
送信処理は、送信ボタンのクリックイベントとして実行されます。
GetPrompt()関数でtextareaからプロンプト文字列を取得します。
それが空の場合は、「プロンプトがありません」と表示します。UpdateAiResult()関数で表示します。
空でない場合は、IClientToServerのobjectにして、JSONデータに変換してサーバーの"ai-api"に送信します。
サーバーから返ってきたJSONデータを、IServerToClientのobjectにし、結果をUpdateAiResult()関数で表示します。
実際の実行例
まず、public/script.jsを作成します。作成はesbuildを使いました。以下がそのログです。
> esbuild --bundle --outdir=public --format=esm --charset=utf8 src/client/script.ts

  public/script.js  1021b
次に、Denoサーバーを起動します。
> deno run --allow-net --allow-read src/server/main.ts
Listening on http://0.0.0.0:3456/
次に、public/index.html で、コメント化していた script.js の読み込み部分を、有効化します。
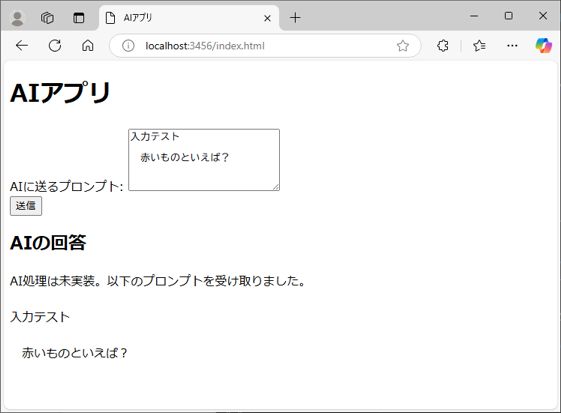
そして、ブラウザで localhost:3456/index.html にアクセスします。次のように表示されました。

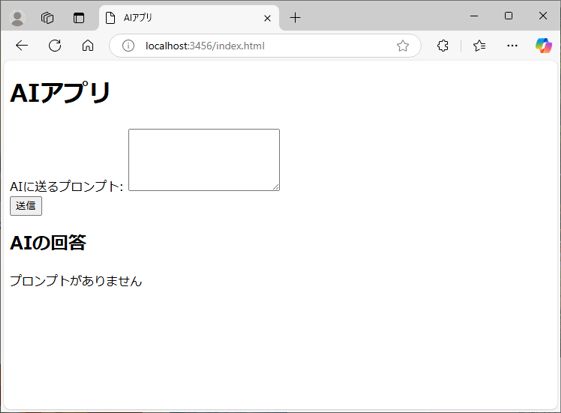
プロンプトの入力した文字がそのまま表示されました。プリンプトが空のまま送信ボタンを押すと、下のようになります。

今回までの作業状況
今回の作業でcommon/interface.tsが増えました。以下に最新のディレクトリ構成と状況を記載します。
/project-root
|-- /public
|   |-- index.html
|   |-- styles.css(未着手)
|   |-- script.js(script.tsから生成される)
|-- /src
|   |-- /common
|   |   |-- interface.ts(New)
|   |-- /client
|   |   |-- script.ts(New)
|   |-- /server
|       |-- main.ts(Update:ブラウザ側との通信処理を実装)

コメント